4.19.2023

Take Risks with Color!

 by Lisa Larrabee

Value does all the work, but color gets all the credit.  That phrase gets thrown around a lot, but what does that even mean?  

We love color!  Colors can be subtle or dazzling.  Colors are powerful and can be used to get our attention or to communicate feelings.  However, value relationships are often the foundation of a drawing or painting.  Values can be essential to providing structure and to creating the illusion of light, form and depth.

Organize Colors by Value

If you want to experiment and take some risks with color, it can help to begin by first considering your values.  In the example below, I began with a black and white photo reference that had a nice range of light, medium and dark values.  I selected colors fairly randomly based on what I thought looked interesting while making sure I had different values.  I then sampled the colors on my gray toned paper in order of dark to light.  


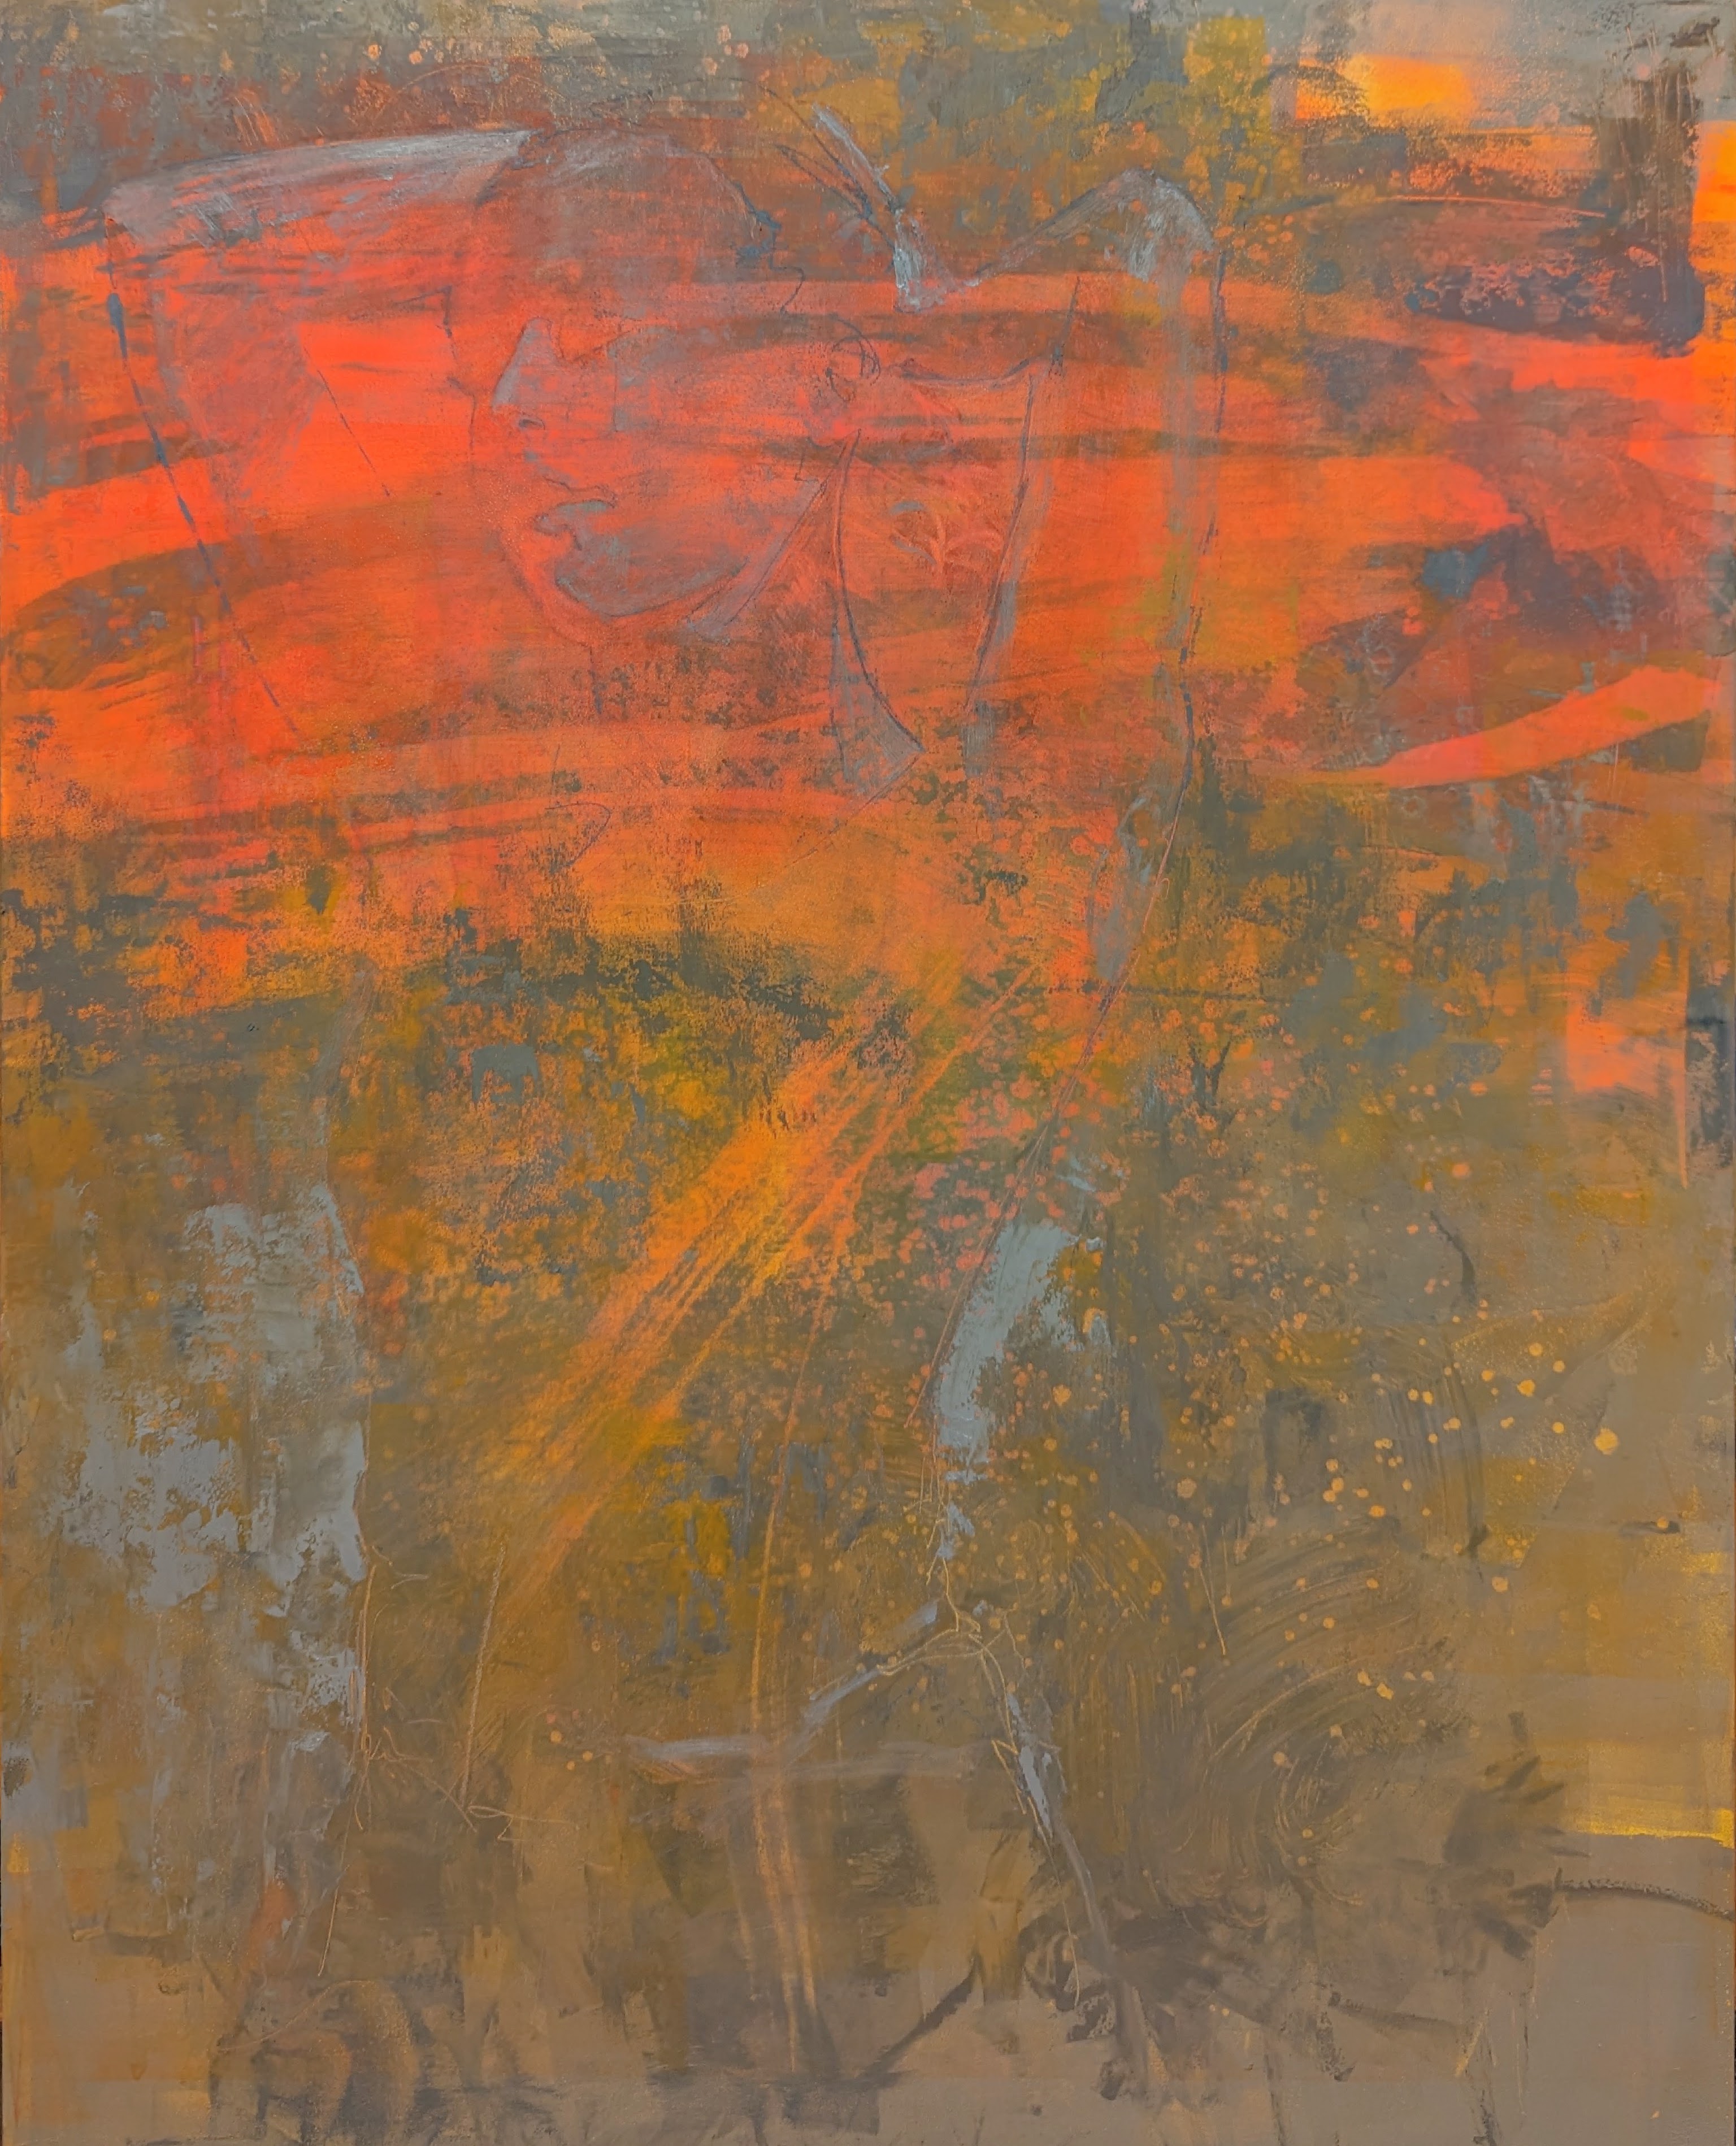
I have been inspired recently by the drawings of Viktoria Maliar and her bold mark-making and color choices.  It reminded me of exercises I did when studying the mark-making of Vincent Van Gogh's portraits back in college.  I approached this study similar to others I have done when experimenting with my color choices.  I focused on placing values where they belonged regardless of whether it made sense for the local color of the subject and with zero regard for lighting color or temperature.

I began by putting my lightest color (yellow) where I saw the lightest value.  The second lightest color (blue) was used to block in the second lightest value.  The teal and mauve are very close in value, so I made artistic choices that helped me clarify different parts within the value range.  I used the burgundy more for drawing accents than to create dark value shapes. I never added my darkest value (brown) because I felt the drawing was finished.

If you look at this drawing in grayscale you will see that there is order to the values.  That does not mean that the values are accurate to the reference.  The original photo reference had much bolder, darker shadow shapes.  I chose to stay in the mid to light value range with the dark color as an accent.  Still, you can see that there is a sense of light and form of the subject as a result of the values having a sense of order and observation.  The values are doing the work while the color gets to have all of the fun!

Artist Tip

You can often discover weaknesses is your artwork by taking a digital photo and switching to grayscale. Looking at your work without color will help you identify how well you are grouping shapes by value. This can be used abstractly to analyze your overall composition and design. It can also help to see where colors may be deceiving you by creating light or dark values out of context when trying to depict representational light, form or depth. It is important to note that your artwork does not have to "work" in grayscale to be successful in color. There are many exceptional paintings that rely on color and temperature shifts that stay within a reduced value range. This can sometimes make a piece appear flat in grayscale, yet be mesmerizing in color. Viewing your work in grayscale is simply a tool you can use to help you see it differently.

Play with Color

There is no wrong way to play with color.  Try a variety of combinations to see what you are drawn to and how the color choices affect the overall mood of the piece.  Choose colors you think look pretty together.  Choose colors you think are hideous.  Which colors feel happy, peaceful or melancholy? Use any colors that you want, but place them based on their values.  


I digitally replaced colors from my drawing in Photoshop to show an example of how much the artwork can change with different color choices.  The subject, mark-making and value placement is the same, but the drawing feels completely new.  Creating similar multiples provides an opportunity to analyze the differences.  For example, there is more unity in the digital variation because I used analogous colors (colors next to each other on the color wheel).  The light blue accent has more color contrast than the pinks and purples, but it is less saturated, so it feels less jarring.  In the original, the yellow highlight against blue has significantly more color contrast because yellow and blue are further apart on the color wheel.  The digital version may also feel more comfortable because the pink tones feel more true to realistic skin tones than light blue and teal.  (My family thought I had drawn a character from Avatar!).  This doesn't make one version more right or wrong than the other.  It is simply an opportunity to examine how different color choices can affect our experiences.  Experiment and have fun!

Art Challenge

  • Choose a simple subject. I recommend a black-and-white reference, so you aren't influenced by color.
  • Ensure you have a good range of value shapes from light to dark.
  • Draw or transfer your subject onto your white or toned drawing paper.
  • If it is helpful to you, lightly map outlines around values shapes.
  • Select colors that include light, medium and dark values.
  • Order your color choices by their value from dark to light.
  • Use the color that corresponds with the value from your reference.
  • Create the same subject multiple times to contrast the differences. 
You can mix and match whatever color combination you want.  Start with simple combinations and add bolder choices as you feel comfortable.

~ Lisa  

4.06.2023

Give It Time

by Lisa Larrabee

If you follow my progress, you will know that I love to experiment. My exploration influences the classes I offer. In the last six months, I have taught classes on expressive drawing, experimental color and portrait essentials. During that time I focused on a variety of mediums outside of my traditional oil paint. I did not consciously consider how my exploration would effect my painting; I just absorbed the information. The painting below had been set aside for several months.  I wasn't sure how to finish what I had started.  When I recently returned to this painting, I had new solutions to try.


I loved the vibrancy and heat of the red-orange against the gray, but I was afraid I would lose the energy if I followed my traditional process because the color palette was out of my comfort zone. Setting this painting aside was essential. During my break from the painting, I was able to further explore atypical color combinations in colored pencils and pastels. I also dug deeper into the anatomy and structure of portraits and facial features for my classes. Applying this knowledge allowed me to finish my painting in the way that I envisioned. I would never have thought to paint her highlights using Veridian green, but here we are!


Too often we feel that we must stick with a problem and see it through to the end without ceasing.  Putting the problem aside can feel like failure.  That is perception not reality.  I cannot tell you how often I have discovered a solution to one problem when I have given it space and focused on something else.  Not all solutions require conscious analysis.  Our brains are complex and capable of considering more than we realize.  Working on multiple pieces (studies and exploration included) provide opportunities to be creative and productive without forcing a solution.  With deadlines, it is not always an option.  That said, I think it's important to remove any judgement we place on ourselves by giving a problem time and space to be resolved.  Often time is the missing part needed for the solution.

~ Lisa


3.16.2023

Start with Color

by Lisa Larrabee

Why start your drawing or painting on a color?  A background color can set the mood for your artwork and unify the elements right from the start.  It has the power to neutralize or enhance the colors layered over it.  Certain background colors can add or reduce energy, effecting the entire piece.  When a single decision has so much influence, it is important to take the time to explore the possibilities!

Effects of a Background Color

There is much to consider when choosing a color to build upon.  Think about how much you want to allow the background color to show through. You can draw or paint in a way that lets large areas of the background color be visible, or you can let little bits of color show through between the marks or brushstrokes.  You can choose to layer or blend the medium so that the color shows through subtly.  Depending on the medium, you can also cover areas opaquely to hide the color underneath.  How much you choose to reveal the background color will effect the overall style and mood of your piece.

Profile on Cool (Whisper) & Profile on Warm (Promise) - by Lisa Larrabee

In these two examples there is a lot in common, but each painting captures a different mood.  Both portraits have soft edges, reduced detail, high-key values and are of the same model.  The portrait on the left was painted over a cool lavender background.  The portrait on the right was painted on a warm orange-pink.  It can be very helpful analyze the effect of a change when other elements stay the same. You can think of it like a scientific experiment where you keep most variables the same in order to best identify the effect of the change.

Color Considerations

  • Temperature refers to the relative warmth or coolness of a color.  We can simplify the color wheel by dividing it in half by temperature.  Red, orange and yellow are on the warm half.  Green, blue and violet are on the cool half.  (Temperature is relative, but that is another discussion.)  Choosing to begin on a warm background verses a cool background can set the mood before you even begin.  Warm colors can feel comforting like a sunny day or cozy fire.  They can also be passionate or aggressive depending on the hue and intensity.  Cool colors can feel refreshing, tranquil or even melancholy.   The color itself won't create the mood, but it will effect it. 
  • Contrast: We often think of contrast in terms of value (light and dark).  However, contrast is simply a noticeable difference.  The further two colors are from each other on the color wheel, the more different and contrasting they are. Complimentary colors are opposites and create the most color contrast. Color contrast is effective for drawing attention and for creating energy between colors. Choosing a background with low contrast (a color that is similar to the color of your subject) allows you to smoothly block in your subject without resistance.  Imagine painting a portrait over a warm neutral base color.  The background color helps fill in the gaps and you can add both dark and light values without the starkness of starting on white.  Now, imagine choosing a background color that has high color contrast to your subject.  For example, a soft warm background can create stunning color contrast underneath a cool, snowy winter scene. 
  • Chroma is the strength or intensity of a color.  You can reduce the chroma of a color by adding white to create a tint, gray to create a tone, black to create a shade, or the compliment to neutralize the color.  Choosing a background color that has less intensity will make it easier to add colors because it is less demanding of your attention and it will have less influence over the added colors.  Working over light blue-gray is very different than working over a soft orange tint or a tan base.  However, it is an entirely new challenge to work over a high-chroma red or brilliant turquoise.  The more intense the background color is, the more control you must have to make it work for you.  The colors will do unexpected things!

Color Agency

Color is an incredibly powerful element of design.  It can create feeling, add energy and pull the viewer's attention.  It is important that you don't give up your agency to your colors.  To use color with agency means to have a feeling of control over your color choices and their consequences. Making bold color choices can sometimes make you feel like you lost control and the color took over.  Colors can play tricks on us.  High chroma colors can fool our eyes into thinking that a color is lighter in value than it is because our brain perceives it as bright.  We can also get distracted and let colors pull the focus away from what we intended.  

Here are some tips for getting control of your color choices:
  • Limit your palette. Get really familiar with fewer colors or color combinations before you add more.
  • Photograph your work and check it in grayscale to see if you kept control of your value relationships.
  • Create simple studies that let you experiment with color choices without self-imposed pressure to make a great piece.
  • If working over a bold background color, spend time immediately blocking in large color/value areas to subdue the background and create context for the other colors.

Painting stages - Chasing Light, oil on panel, artist Lisa Larrabee

In my painting, Chasing Light, the glow of the sun and the light on the landscape needed to be dominant. I began with a yellow background to allow warm, luminous color to show through the brushstrokes.  After blocking in the sun and sky, I wanted to make sure to bring down the values and adjust the temperature of the landscape so that the sun would feel like the brightest object without competing with the yellow in the field.  I had never chosen yellow as a background color before, and I was mindful of how easily such a bold, bright color could dominate if left unchecked.

Choosing a background color can be a game changer, so don't be afraid to try out a wide range of possibilities and see how much it can impact your art!

Art Challenge

  • Choose a simple subject. I recommend a black and white reference so you aren't influenced by color.
  • Ensure you have a good range of value shapes from light to dark.
  • Draw or transfer your subject onto different colored backgrounds.
  • Use limited color choices over a variety of colors and create small, quick studies.
  • Draw or paint the same subject multiple times to contrast the differences. 


  • On the left, I used black, white and yellow-orange on gray-green paper.
  • On the right, I used black, white and light blue on warm tan paper.
In these examples, I chose a warm color on a cooler background and a cool color on a warm background.  You can mix and match whatever combination you want.  Start with simple combinations and add bolder choices as you feel comfortable.  Keep values in mind as you explore color. 

Have fun!
~ Lisa

2.28.2023

Setting the Tone

by Lisa Larrabee

What do you consider before starting a drawing?  An obvious choice would be to start with your subject.  Then, maybe you consider the composition and how you want to place your subject.  What you want to include verses what you might choose to leave out.  Which medium you intend to use, etc.  How much thought do you put into choosing a background tone?  If you aren't thinking about these options, you are missing an opportunity.  


Choosing a Tone

tone is the relative lightness or darkness of a color.  

  • White: When you choose to work on white paper, you begin by adding values in one direction.  Your lightest value is already established and you can only add darker values.  Working on white can give your artwork a light and airy quality if you let much of the white remain.   It can also allow you to build luminous colors or a full value range from white to black.
  • Mid-tone: Working on a mid-tone allows you to develop your artwork in two directions (from the middle out).  It can help you establish a sense of light and shadow very quickly by blocking in darker shadow values and adding brighter, lighter values.  Working on a mid-tone can also act as a unifier by showing the tone through different areas of the artwork. Drawing on a mid-tone gray paper feels very different than creating the same drawing on a mid-tone tan paper.
  • Black: When you begin on a black surface, you can only add values in one direction (like with white).  However, the black absorbs the light rather than reflecting it.  This can desaturate your colors and darken the values of your medium.  Create test samples to see how opaque your medium is and how light a value you can create over the black.  This will help you establish the full value range you are working in over the black surface.

Value Traps

Be on the lookout for value traps.  Working on each background value can have its own trap (or typical mistake) because value is relative.  It is important to establish some general value relationships to provide context before adding detail.  Your brain will subconsciously adapt to the values you are working within (even when you know consciously that you haven't added your darkest shapes or your brightest highlights).

When starting on white, block in dark and mid-tone areas.  If you focus on the details in the subject too soon, before adding a dark background, you may find all of the values in the subject are too light because you developed them against white.  The reverse can be true when working on black.  

When starting on a mid-tone, it is also important to establish the value range you want to have in your finished piece.  For example, if you wait to add all the highlights at the end, you may have to go back and adjust subtle value relationships because your brain was interpreting the mid-tone as a lighter value against the darks because it didn't have the light values for context. 

Consider your medium.  If you are working in graphite, you won't have the full range of dark values that you would have if working in charcoal.  Explore what your value range is from light to dark using your chosen media on your selected background.  If you want your drawing to be high-key (limited to lighter values) or low-key (limited to darker values), establish how dark and how light you want to go and then build value relationships within your chosen boundaries.


General to Specific

I recommend developing your artwork from general to specific so that you are building shapes and values in relationship to everything else. 


In this example, I have used graphite pencils on white paper.  After blocking in my initial sketch, I immediately began establishing values over everything that was not my brightest light.  This is very similar to toning the paper before you begin, but it allows you to preserve the white of the paper where you know it is the lightest.  If you tone the entire paper with graphite or charcoal, you will often not be able to fully erase back to white.

Art Challenge
  • Choose a simple subject to draw.
  • Make sure that you have a good range of value shapes from light to dark.
  • Draw or transfer your subject onto different values of paper.
  • I recommend drawing the same subject multiple times to contrast the differences.
  • Draw from general to specific.  
  • Establish your darkest and lightest values and keep the value relationships in mind as you develop your drawing.
  • I recommend drawing the same subject multiple times to contrast the differences.


Demos of a mouth cast using different drawing media and paper choices

From left to right:
  • Black and white charcoal pencils on Strathmore Toned Gray paper.
  • Vine charcoal and charcoal pencils on drawing paper (white).
  • Graphite HB pencil and white pastel pencil on Toned Tan paper.

Experiment with different toned papers or tone your own with graphite or vine charcoal.
Check out my previous post for more examples of working general to specific from a toned background:  Drawing General to Specific: Graphite vs Charcoal

~ Lisa


1.27.2023

Negative Space (Why It's Such a Big Deal)

by Lisa Larrabee

If you do an online image search for "negative space drawings" you will find a tremendous number of examples that range from traditional academic exercises to very creative design solutions.  Variations of negative space exercises exist at all levels of drawing classes (whether or not it is explicitly labeled as such).  So, what is "negative space" and why is it such a big deal?

Negative Space is a term used in art to describe the space around or between an object or multiple objects.  You can think of the object itself as the "positive" form that you can typically touch (like a houseplant).  The "negative space" is all of the space around the object that you cannot touch (like the spaces around and between the leaves).


In this example the positive form is a clipping from a fig tree.  There is a lot of detail that you may focus on if you were drawing, painting or simply observing this subject.  There are overlapping leaves creating lighter and darker values and different shades of green.  There are subtle details like the veins along the surface or the textures of the branches.


When I blackout the positive shapes, we loose the previous detail.  The focus is still on the subject, but the emphasis is now on the unified shape created.  It is like a silhouette with flattened shapes.  This is an example of simplifying the figure-ground relationship.  Our figure-ground perception allows us to group visual information as foreground and background.

Creating an inverse of the black and white places more emphasis on the negative space.  These dark shapes visually carry more weight which make us pay more attention to them.  In the previous example, the negative shapes were white which allowed our brain to dismiss these negative shapes as "nothing" in order to focus on what our brain perceived as "something".

The most recognizable example the figure-ground relationship was developed by the Danish psychologist Edgar Rubin. When shown the first version (left) our tendency is to notice the two profiles in silhouette because they carry the visual weight.  When the image is inverted (right) what was the negative space now has the visual weight and we can more easily see the vase in between the faces.  The figure-ground relationship is flipped.  The vase becomes the "figure" and the profiles become the background.


Why Is Negative Space a Big Deal?


Accuracy

Negative space is equally as important as the positive space.  You cannot draw an object accurately if the negative space is inaccurate.  If you develop your ability to focus on the negative space, you can use those negative shapes to more accurately draw the positive shapes.  The focus becomes less about what the subject is and more about the relationship between the shapes.  Viewing the negative space as simple shapes also makes them easier to draw.

Composition

Consider how to balance the design elements between the positive and the negative shapes (or the figure-ground).  How you place and/or crop your subject can create interesting negative shapes with the boundary of your artwork.  You can choose to comfortably balance the relationship between the positive and negative shapes or choose to emphasize a greater amount of positive or negative space to support a mood or narrative.  There are also opportunities to play with the figure-ground relationship that create surprising illusions (like Rubin's vase).  There are many examples of drawings, paintings and graphic design that use the positive/negative figure-ground relationship to great effect.  Search figure-ground illusions for some incredible examples.

Editing

Do not underestimate the power of editing.  Selecting what information to leave out is just as important as deciding what should be included.  Our natural tendency is to focus on the positive subject and ignore the space around it because our brain filters out the space as being less important or "nothing".  There are so many interesting details in a subject (light and shadows, colors, textures, etc.) that it can be difficult to focus on the negative space.  However, there is an opportunity to reduce detail in your subject and emphasize the interesting shapes and variations within the negative space.  Creating artwork with dynamic negative space opens up so many many incredible possibilities.  If you have been ignoring or neglecting the negative space, you are missing a huge opportunity.


Emphasizing Negative Space

In this example, you can see that I began my painting by blocking in colors in a range of mid-values (nothing too light or dark).  I also layered pigments and built up some textures.  Once the surface was dry, I sketched in some of the important shapes of the tree and the figure with paint.  There is very little detail in the primary or secondary subjects.

Spring Renewal -early painting stage, artist Lisa Larrabee

I created the strongest value and color contrast when I painted the negative spaces around the tree.  Nothing within the subject was painted equal to the light value of the sky.  I added very little information to the tree.  Mostly the landscape was painted around it.  I developed the figure to a degree, but I also left out much information.

Spring Renewal, oil on panel, artist Lisa Larrabee

People have often commented on the "pink flowers in the hair".  This is an example of the figure-ground relationship playing tricks in your mind.  Without the figure, the light pink daubs of paint read as the sky showing in between the gaps in the foliage of the tree.  They are negative shapes that are part of the background.  However, if you focus on the figure, the paint daubs connect with the subject and become interpreted as flowers in the hair.

Art Challenge
  • Choose a  subject that has interesting negative shapes.  Look for examples with closed shapes (negative space surrounded by positive form).  
  • Organic shapes (like plants) are more forgiving.  Structured inorganic shapes (like a pair of scissors or a chair) will help you more easily identify mistakes.
  • Do NOT sketch in guidelines of your subject. Try to hold the positive form in your mind, but do not draw it.
  • Draw the outline of a negative shape. "Jump over" the positive form to the next negative shape.  I like to begin with a closed shape (like the examples in orange).

There are many variations to try.  I have students begin by toning paper (either with vine charcoal or graphite).  This is very forgiving because you can blend away mistakes into the tone and try again when needed. Once all of the negative space is drawn, you can either erase the tone from your subject (which emphasizes the negative space), or you can erase the negative space which will reveal your positive subject. 

You can also draw your negative shapes in pencil and then color them in when finished.  Have some fun adding color or whimsical patterns.  In school (at KCAI), I did numerous negative space studies using India ink and a brush. I couldn't go back to fix most mistakes, but the results were very graphic and bold.

Be prepared for your drawing to get off track because you aren't sketching in any guidelines.  That's expected.  Make the corrections and keep going. 

If you find it too difficult to draw only the negative space without any of the positive, give yourself  very light guidelines so you don't get lost.  Don't get discouraged.  The more time you spend concentrating on the negative space, the more your brain will get used to "seeing" it rather than ignoring it.  With practice, you will develop better drawing accuracy and make more interesting design and composition choices that incorporate the positive and negative shapes more intentionally.
Best of Luck!

~ Lisa


For more examples using negative space in painting, check out my previous posts:

Painting Negative Space: Part I

Painting Negative Space: Part II

Painting Negative Space: Part III

1.24.2023

Facial Features: Cross-Contour Mouth Sketch

by Lisa Larrabee

If you want to improve your drawing and painting, take time to focus on your subject from an academic perspective.  Although it is essential to play and experiment, it is also important to dedicate time for disciplined study to learn more about your subject.  In this example, I focused on the mouth.  However, this type of practice will help you better understand the form of any subject.


I worked from a photograph for this study.  I added cross-contour lines to better understand the dimensional form of the mouth.  Cross-contour lines are lines that follow the surface of the form.  (In contrast, contour lines follow the edge or boundary of the form like an outline). Cross-contour lines often do not physically exist, although they can.  For example, a striped object literally has lines on it that follow the surface of the form.  Also, a shadow cast across an object can reveal the contours of the surface of that object.  In order to convincingly create cross-contour lines, I had to consciously analyze the structure of the mouth and visualize the flat photograph as a 3-dimensional object.


Typically, I prefer to block in simple value shapes and build up my drawing or painting by refining shapes and values from general to specific.  (I have several posts that demonstrate that process including this Mouth Study).  However, sometimes we don't get the information that we need from a photo, or we have a limited time with a subject from life.  Whenever I get stuck and something doesn't look right, I analyze the structure of the object to see where my shapes do not align with the structure of the form.  

Light and shadow shapes are often more forgiving.  Cross-contour lines are not so kind.  When the lines do not convincingly follow the surface of the form, they just do not look right.  That is what makes cross-contour drawing such a great exercise.  You can't fake it, so you really have to understand the form.  Developing this knowledge of your subject will help you create more convincing form whether you are rendering your subject realistically or more expressively.  

I sincerely recommend you give it a try.  Expect to make mistakes.  Erase the lines that didn't work the way you expected and try again.  It is more about learning and understanding the form than the finished drawing.

~ Lisa


1.17.2023

Expressive Mark Making

by Lisa Larrabee

Not everything we make needs to become something.  I cannot stress enough the importance of experimentation and play without an end result in mind.

This is a demo where I modeled a variety of different types of mark-making using graphite and charcoal.

There is absolutely no wrong way to do this.  Give yourself a nice large sheet of paper and explore how much variety you can create using drawing tools that you already have.  Turn pieces on their side.  Twist the pencil or piece of charcoal or graphite between your fingers. Vary the amount of pressure. Smear the marks with the side of your hand.  Draw with a blending stump.  Make marks with your fingers.  Use erasers to create marks.  Change directions or explore a rhythm that feels new or awkward.  Create flowing marks, then make your hand shake/tremor as you draw.  You get the idea.

Consider the variety of marks that your regular ol' drawing tools are capable of that you hadn't explored before.  

It's like buying new art materials, except you didn't need to.  You are just beginning to explore their potential.

Once you have created a whole bunch of different marks, think about their different qualities.  How do they feel?  What mood do they communicate?  Choose a feeling and try to draw a neutral subject that communicates that feeling using different types of marks.  

I like to have students begin with "angry" drawings and "peaceful" drawings because of their clear contrast.  This is my angry drawing verses my peaceful drawing.


Both were based on a neutral subject (a still-life with leafy branches), but I had the option to alter or edit out whatever I wanted to best communicate the feeling.  In the "angry" version, I included the pot, in the "peaceful" version, I edited it out on my second attempt because I liked the simplicity and I didn't want the pot to weigh it down.

It is important to recognize that the feeling or mood is not dependent upon the subject.  In fact, choosing to make artistic decisions that feel contrary to what we typically associate with the subject can create a compelling image that allows the viewer to build a story.  It invites interesting questions:  "Why did the painting feel happy at first when the person depicted looks miserable?" or "Why does a bouquet of flowers feel so lonely?"

It is equally important to recognize when your artistic choices align with or contradict your intention.  Do these marks (or values, or shapes, or colors) conflict with or support my feeling?  This is a much bigger discussion, but you can begin by exploring what kind of marks you can make and how those marks feel when you begin to put them together.  Take a chance and see what happens.

~ Lisa

1.04.2023

Why Make Studies?

by Lisa Larrabee

                                                                                                      Artists often create studies before beginning their artwork.  A study can be a detailed drawing or painting that allows the artist to observe a subject thoroughly and learn more about it. Studies can also be quick, simple images that let the artist work through a variety of options before committing.  
Each type of study could be it's own post, but the following list is a summary:

  • Composition Studies focus on how different elements are placed within the boundaries of the artwork.  There are many guidelines that can help you make strong compositions such as using the rule of thirds, a pyramid/triangle composition, "S" composition, circular path, etc.
  • Value Studies help to plan a value map within your composition. This is an opportunity to group similar values to create larger unified shapes and create contrast in areas of interest. You can also establish a mood by exploring whether your artwork will have a high key (light value range), low key (dark value range) or whether it will will include a full range from dark to light.
  • Color Studies should be based off of your value study.  Experiment with a variety of color choices to see how they impact the overall feeling of your piece.  Consider whether to use a limited or full color palette.  You can also use color studies to create emphasis through color.
  • Detailed Studies are often more about observation and accuracy.  The purpose is to spend time with your subject and get to know the structure and form.  Studies may be done from different perspectives either to consider which angle is preferred or simply to better understand the subject as a whole.
  • Style/Technique Studies can be used to explore which techniques you want to use or what options you have to stylize, exaggerate form, introduce textures or patterns, etc. 

If studies are so helpful, why are so many developing artists resistant to doing them?  One reason I hear the most, is that they just don't want to spend the time.  They are excited to get started and they don't want to loose their initial energy and momentum.  There are many artists that jump right into their artwork and allow the challenges to be resolved through the process.  However, this has its risks!  Taking time at the start to explore your options through studies allows you to contrast what works and (just as importantly) what does not.  It creates opportunities to resolve problems before they come up in your artwork.  This can save you from wasting time trying to resolve a problem on a larger piece that could have been addressed in a quick study.  Studies also give you the freedom to explore ideas that you hadn't considered when you first started that may be more interesting than your initial plan.  

Quick Study Demo

Let's look at some simple composition/value studies and the thought process I used when making changes from one to the next.  

I took this photo hiking with my family.  I thought the old, abandoned miners cabin was quirky and full of interesting angles.  

It is important to identify what it is that drew you to your subject.  Maybe it was the shape, the lighting, the textures or the mood.  When you are clear about what you found interesting, you can consciously use that information to guide you through the many choices that will present themselves.

These studies are small and quick (about 3-4").  I used pencil to mass in simple value shapes and a sharpie add the bold contrasting shapes.


The first version on the left looks like the cabin is an isolated dark shape stuck to the side of the composition.  I darkened the value of the foreground to create a more integrated larger shape. The change creates a more interesting division diagonally.  The lighter top shape is mirrored by the darker bottom shape.  Still, the overall design is pretty boring.  Most importantly, it does not communicate what I found interesting about the subject.


With the second study I chose to zoom in on the doorway.  This allowed me to play up some of the funky angles of the cabin and give a glimpse into the angles inside that I found interesting.  

As I was sketching this study, I paid more attention to the stacked logs.  I realized that there was an opportunity to play up the repeated pattern of the circles while also emphasizing how the building was falling apart.  

There were still problems to address, but I felt that I was getting closer to something interesting.  


In the third study, I cropped out some of the heavy dark roof and adjusted the values so the interior was more visible. When creating your studies, it is important to include the boundary that you are designing within.  It is also important to leave extra space around the border.  This serves two functions.  First, it creates a visual separation between each study so that the compositions don't run together.  Second, it gives you room to extend the boundaries should you choose to.


Study #3 has three versions.  I wanted to lengthen the door and exaggerate the shape, so I extended the boundary at the bottom of the image.  However, I felt the door was too centered.  I also really enjoyed the irregular edge of the corrugated roof that had been cropped out of the picture.  By extending the boundary on the left side I enhanced the diagonal pattern of circles and created a more interesting negative shape that echoes the triangular roof shapes.

Creating studies is all about exploring your options and problem solving.  Each study I did gave me new information.  I analyzed the study to identify what I felt was working and what wasn't working and then created another version based on my analysis.  The studies were quick and messy, but they gave me all the information that I needed to create an image that captured what I found most interesting about the subject -the quirky, irregular angles both inside and outside the cabin.  

If I had skipped this process and jumped right into a finished piece, it would have been mediocre at best.  All the techniques in the world cannot save a weak composition.  Most importantly, it would not have communicated what I found so exciting about this old cabin.  Take a little time to explore your options with some quick studies.  You may be surprised where they lead you.  

Art Challenge
  • Choose your subject.  Ask yourself what it is that drew you to it. Be specific.  It will help in your decision-making.
  • Select from the list of studies (composition, value, color, detailed observation, or style/technique).
  • Explore your options.  See how each decision you make affects the outcome.
  • Choose the option that best communicates what you found most interesting about your subject.

Exploring your options through quick studies allows you to try things you wouldn't usually try.   Some will work, and some won't.  Learn from your successes and failures to determine what you want the piece to become.  You can't fully know the potential for a piece without spending some time considering the many choices available to you.

~ Lisa